

|
LEDTSB : A Tutorial |

|
The LHCb note describing the LEDTSB may be found at LEDTSB (note preliminary) LEDTSB installed in the FSM
The LEDTSB you want to use has been installed by an expert. You simply want to use it. If not contact an expert. Installation Help. Getting access to a LEDTSB already installed in the FSM
You should first have a DNS server running and connect a SpecsServer to it. |
|
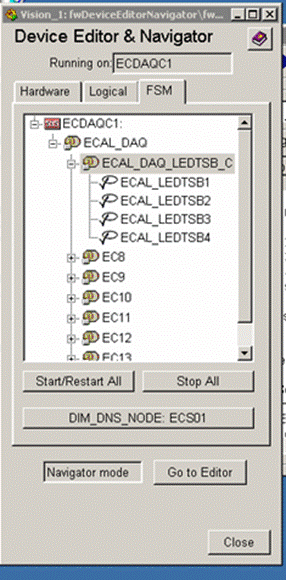
Using the FSM Device Editor Open the PVSS project and start the Device Editor. You should be in the Navigator mode (see example on the right). From a desktop shortcut
That's the easy way. You should have a shortcut linked to the Calorimeter FSM hierarchy. You may navigate down to your crate and the LEDTSB you wish to look at. Standard Configuration (Recipe)
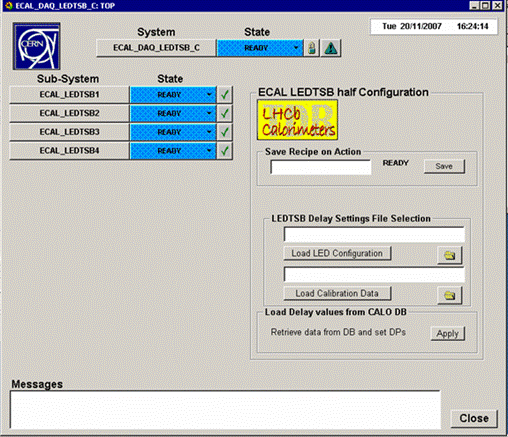
Right click on the control unit you want to have a look at (here ECAL_DAQ_LEDTSB_C) from the FSM tree, and select the view option. This should open a window similar to the one below except from the fact that the LED system control unit is probably in NOT_READY mode. You may either press the NOT_READY button of the control unit or specifically of the LEDTSB and select Configure. After you ask for a configuration, the default settings (called PHYSICS) should be proposed and you should accept this default. |
|
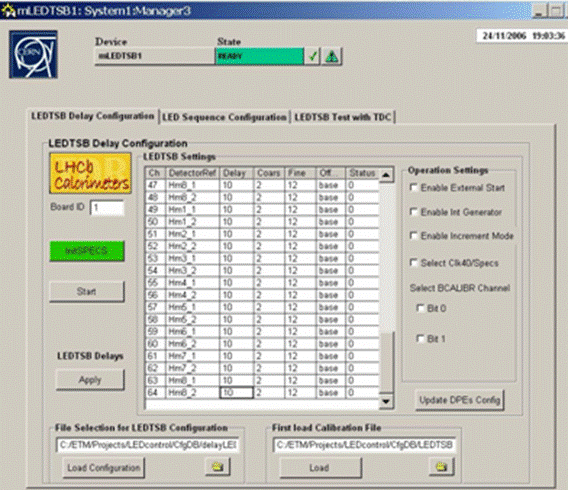
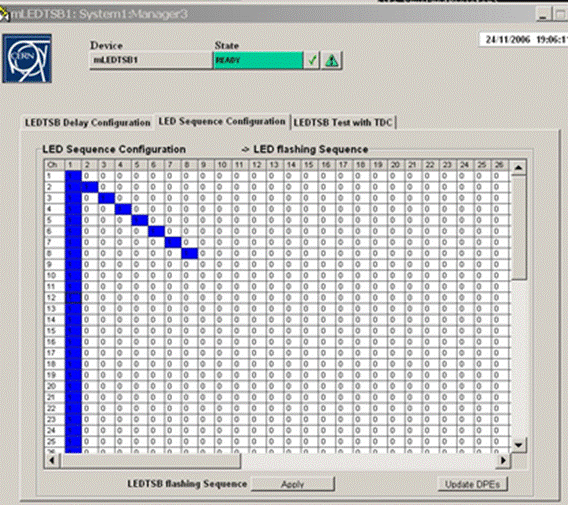
The LEDTSB boards configuring is performed by standard FSM way. In the same time to prepare or modify a recipe one needs a mechanism to update a recipe content. The LEDTSB half Configuration panel allows to load new values from the configuration files or from the dedicated CALO Data Base. The LEDTSB parameters could be modified and with using the expert LEDTSB panels too (see below). After updating the recipe content one can save the recipe with specified name (if no name specified the default type PHYSICS is applied). |
|
Configuring a LEDTSB manually |
|
LEDTSB configuration sequence on the PHYSICS/Configure action · Load the time calibration matrix · Load the LED flashing sequence matrix memory · Load the Delay chips values · Set the Specs Slave register 4 to 0x84 for enabling the channel B calibration signals and using the main 40 MHz TTC clock |
|
Last update of the LED system tutorial 20.05.2009 |